To contact Kat drop her a line at katguevara@ymail.com

Friday, August 24, 2012

Post Gen Con

So I'm back from Gen Con, which was a total blast since I took a big step away from volunteering to run much for my game group, which freed up my time to do some other things. I got to walk the floor in the dealer hall and chat with people a bit more as well as hang out with a good buddy of mine when schedules allowed.

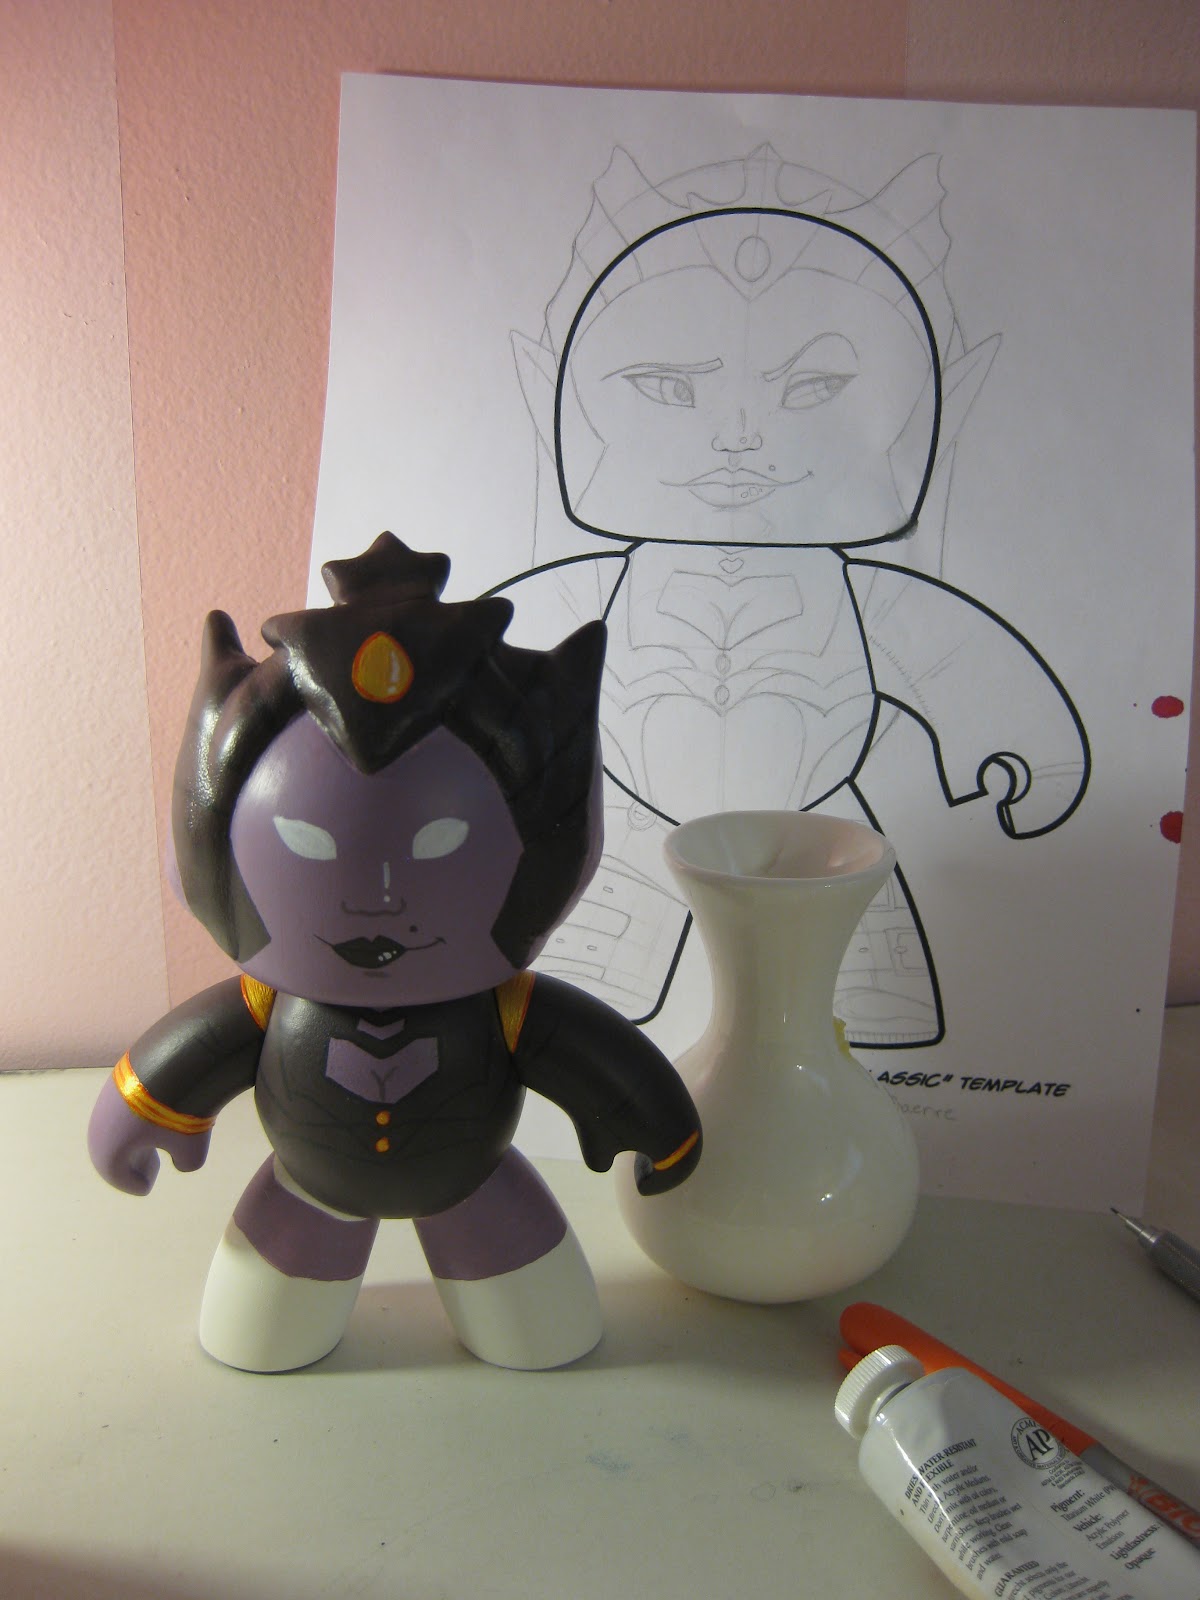
Mighty Muggs on Display
I got a chance to stop by to visit my mighty mugg that I did as a design challenge for ArtOrder, and checked out the others there as well (everyone did a smashing job!). I also had a chance to sit in on some paint overs by Todd Lockwood, and while my USB wouldn't work I was still able to pick up a lot from the experience and hope to have a chance to meet up with him again at a future convention. 

There was also the Brimstone Drawing Club, which made it's debut at the convention. It's ran by Natanya Rubin and Kyle Bice, and featured some awesome models! I hope they come back next year and I hope they have at least a later session to see if they can snag any of the artists from the hall to come in and draw. 

Little Alice
I also had ad double portfolio review from WotC's Jeremy and Kate, as well as a later one from Zoe from Fantasy Flight. I was pleasantly surprised to learn that despite my own doubts (which were many) that my art is really coming around. I still have things I need to work out, but for the most part they seem fewer and far between. Zoe mentioned that if I can polish off things a little my work could get accepted for publishing, and Jeremy pushed me to delve deeper into my watercolors and gave me a lot of very helpful advice. 

So my focuses will be narrowing down quite a bit in terms of portfolio work, and widening in terms of working with my media. I have to say I feel great about being encouraged to work more on my traditional watercolors rather than digital. 

And last, but not least.....while I was away at the convention my buddy started up a kickstarter for the web comic that we are all working on. So check it out, and donate! And stay tuned for some WIP work on a new painting and possibly an inside scoop on my color work for the comic!

Friday, August 10, 2012

Mighty Mugg Wrap Up

Original Design
So I know that it's been a while since I updated this, and now with Gen Con just a few days away I realized I ought to get on with the wrap of the Might Mugg Challenge (Which has been a challenge and a blast!)

So when I last left off it was when I had started to go into the actual washes of paint to the figure after all the prep work to get there. 

Using the original design as a ref
I apologize for having skipped taking pictures after this point in the process, but sometimes when you get your groove on you just get caught up in the moment when it comes to painting. I decided I didn't like the yellow for the gold in her outfit so I applied a few coats of Golden paint's gold acrylic to give it that shine.  Once the figure was done I spray primed her with a protective coat.

Now a word about the protective sealer. I had bought it but wasn't going to use it once I had the paint job done because I was afraid she would be really hard to photograph. However I ran into some issues with the sculpy acting weird so I used the sealer to try to keep the problem from getting worse. I guess that sculpy III has some change to the chemical base as opposed to the normal sculpy, and despite following directions to boil it to harden as opposed to baking it, there were a few places were it became very tacky. 

Creating the Whip of Fangs
With the Mugg out of the way it was onto her accessories. Again, I kinda got lazy so there aren't any pictures of the process. For the whip I used a bit of a dowel rod, some thin wire which I braided, and some more sculpy....oh, and superglue. God, yes, superglue.

Again I primed and sanded this down before painting it and sealing it. I decided at the end to add a bit of sewing floss to the effect of tongues coming out of the snake head's mouth. For the skirt I just used a piece of faux leather from an old skirt and cut it out after futzing around with it to see how best this would work out. I sewed a bit of wire into the hem to help it hold it's shape to the top and used some velcro to keep it around her waist. I also cut a slip to add as a belt and just used cardboard which I painted as the buckle.
Oh yeah!
You can see how she turned out above. Overall I am quite pleased with how she looks though in hindsight it would have been cool to give her some hair from a scrap of wig or something. And the best thing...?

Quenthel with her comrades on Jon Schindehette's desk!
The best thing was seeing the picture that the AD of WOtC took of her and some of the other muggs from the challenge on his desk! Gen Gon is only a few days away now, and I can't wait to see how all the other muggs turned out. If you'll be at the convention, make sure to stop by and check these babies out!

Wednesday, May 23, 2012

Mighty Mugg WIP: Part 2

So this far into customizing my mugg I have already modified the figure with sculpy clay, primed, and sanded it. That means I'm ready to start painting.

It's not often that I use acrylics, but thanks to having gone to college, they were something I did have to purchase for some of my classes. Which means I happen to have quite a few tubes laying around still. I'm currently working with Golden acrylic paints, and Utrecht brand acrylics but I think just about any kind of paint will do.

First I start off by taking a look at the color study I already have laid out. Once again, that means the image below:

Color Study

I mixed up a nice violet with Ultramarine blue and Cadmium red, adding in some white and black until I got to a color I was happy with for the skin. From there I split half the mixture and added some more blue and black to darken it up a bit more for the color I would then use for the leather parts of the figure. And to make sure that the mixtures wouldn't dry and become plasticy I added in some retarder (again I happened to have the Golden brand).

Now even though I have the retarder in the mix, I want to use thinner washes as I apply the paint, so I make sure my brush is saturated with water before tinkering with the paint, and I do a few tests of the mixture on some scrap watercolor paper.

Once I'm satisfied I begin to paint the figure. At this point I still have the toy broken into pieces to make it easier to paint, so make sure you know which pieces are what and which way they are going to be facing before you paint! 


Above are some of the pieces with a few coats of paint on them. Using a brush loaded with watery paint and slow strokes, I was able to mostly paint without leaving behind any traces of brush marks. I am using a synthetic brush for the painting (retired watercolor brushes that no longer hold their shape). Giving them a little swirl at a 45 degree angle in the paint helps to narrow the tip for places that need more finesse.

I want to mention that I didn't draw on any of the details prior to painting them on. Since I have my original mugg designs out, I am instead eyeballing where certain details are placed. I did run into a problem with the yellow paint mixture I used, which would not apply evenly. Therefore those areas are a little rougher than the rest. 


I've still got a bit of painting to do with this toy, so you'll have to stay tuned for another post. But here's a preview of the detail process to come (a little cleavage never hurts!).

Thursday, May 17, 2012

Mighty Mugg WIP: Part 1


As I may or may not have mentioned in a previous post, I was one of a couple of people who were chosen to modify a Mighty Mugg to be on display at Gen Con this summer. Above is the entry I submitted, and I suppose that since the blank arrived in the mail recently that I ought to begin documenting the process.

Firstly, we were asked to submit in a character we would like to create. I chose the character of Quenthel Baenre from War of The Spider Queen book series, mostly because I really loved her character though out the books. I used the cover she appears on as a point of reference for designing the mug. 

Paint Me!
Now, I am not simply painting the blank mugg. I will need to add onto it, and to do so I will use sculpy clay, which you should be able to pick up at just about any craft shop. I happen to have some already (+ for not having to run out for more), which I plan to use. I begin by pulling off smaller pieces (because I have small hands) and warming the clay up with body heat in my hands to soften it while rolling it into a ball. From there I can easily pull off pieces as I need in order to sculpt with. 

When I was finished adding on the clay, I decided that I wasn't going to bake it for fear of ruining the head of the actual toy. So instead I brought a small pot of water to a boil and dipped the sculpted portions of the head into the water for about 3-5 minutes. Once I pulled the head out the clay had set and become hard just the same as if I would have baked it. 


(Oh yeah, I started this process by cleaning the mugg with some soapy water. I used dish soap for this and was careful not to get any inside. This is important because the mugg tends to have some chemicals on it from where it was made.)

First, I pulled my mugg apart. I found a video on youtube that shows the process. Then I taped the pieces onto some sticks (I used colored pencils since I have so many of them), making sure to tape off areas where the joints will meet. Once that was done I used a spray primer on the pieces.

I did run into an issue with the spray primer dripping down some of the pieces. Don't worry if this happens, since once the pieces are dry you will sand them down so they are smooth. I also used an empty egg container as something to stick the pieces into, though due to the clay on the head I had to use a small vase so it wouldn't tumble over. 


So that's it for the first part of the mugg process. Now that the pieces are primed and sanded down it's onto the painting stage.

Wednesday, March 28, 2012

Surreality

I've been offered the opportunity to do some color work for a friend of mine from the Academy of Art. He's working on a web comic called Surreality that he also plans to publish. Check it out, and those of you @ C2E2 feel free to drop in on Caleb and Carla at their booth!

   
Art by Caleb King
Colors by Kat Guevara

Tuesday, March 6, 2012

Sistine WIP

Just posting a quick WIP of something I am working on atm. I plan to use this in an upcoming portfolio, and am finding that working digitally my artwork looks a lot more polished than my watercolors. Sad, but true.


Sunday, February 26, 2012

Star Wars Pulp

So I finished painting my piece for the Provocateur Gallery/ ArtOrder. I painted this in watercolors, which needed some digital touch up after scanning. If being a watercolor painter has any nasty little demons at all, I have to say the biggest pain is the one who lurks in the scanner.

Anyways, the deadline is due in a few weeks, so this ought to be sent out in time for it. Fingers crossed it makes the gallery!


Wednesday, February 1, 2012

30 Days of Sketches!

Hello bloggers,

This month I shall attempt to draw one character every day for the next 30 days (I only now realize there are only 29 days this month). It's my hopes to get my creative juices flowing, so these are just sketches I am being pretty laid back about doing.

In preparation I did make a list of characters to draw for the next month and some days, so I'm not just pulling ideas out at random as I go along. Just to make sure I don't lose steam in trying to pick some subjects to doodle. With that, check back to see more sketches as I find time to post them up, beginning with:

Dr. Mrs. Monarch!

Wednesday, January 11, 2012

SW Pulp WIP

 After posting my process to the WiPnation forums, where this contest is also taking place, it came to my attention that I had lost a lot of emotion in Princess Leia when it came to the pencil drawing. After doing the color comp I was feeling timid about continuing onto the painting stage, and I am happy I didn't.

Original Sketch
First Draft

Second Draft

In the original Leia is obviously more surprised/shocked by seeing Vader and his torture droid, however after getting a crit my original pencil drawing made Leia look more in control. So I took my drawing back to the drawing board and made the correction. I moved her arm up so it looks more like she is cowering, or trying to shield herself. I also changed the expression on her face, which was my main cause for not going to paint.


Tuesday, January 10, 2012

First Post of The New Year! A WIP

Its a new year, and already there are some projects to be had. In light of playing some SWOR and enjoying a little spiked cider, there are a couple of gallery events that have a call for art. The first is for pin-up work and while I have a piece drawn out I have yet to post it. The second is a call for pulp art, which is what I have posted below.
Pen Sketch

Pencil

Color Comp

Mock Cover
I'm planning on painting this in watercolor, and because of the large amounts of black I decided to do a digital color comp just to be safe. I did consider inking this in but am hesitant since doing so may give this more of a comic book feel. I am also not sure at this point if I will add in the type or not. If I do it will be done digitally. Anyways....back to work!